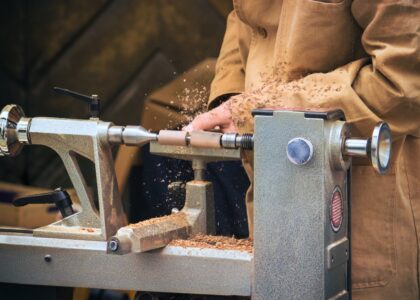
Hey there, my fellow timber tamers! Today, we’re gonna crack open the mystery and give the ultimate answer to a question: how does a wood lathe work? Don’t let it scare you though – according to my own unofficial poll, a good 85% of greenhorn woodturners were as jittery as a long-tailed cat in a room full of rocking chairs when they first faced this beast. But worry not, because by the end of our little chat, you’ll have a better handle on how a wood lathe actually works!
Contents
- 1 Quick Overview: The Core Concepts
- 2 Navigating the Machine: Key Components of a Wood Lathe
- 3 Understanding The Mechanics (Or How A Wood Lathe Works)
- 4 Choosing Your Tools: The Right Crew for the Job
- 5 Accessorize to Maximize Your Wood Lathe Work
- 6 Now, while the lathe is the star of the show, don’t overlook the importance of accessories. They might not be the main event, but they sure can make your woodturning life a whole lot easier and safer.
- 7 Common Problems and Handy Solutions
- 8 Final Reflections: The ABC’s of How a Wood Lathe Works
Quick Overview: The Core Concepts
Alright, before we get too deep in the weeds, let’s start with the bare bones. So, at its most basic, a wood lathe spins a block of wood at a speed you set, while you shape it with a sharp tool.
Well, think of it like a spit roasting a chicken, but instead of getting a tasty dinner, we’re making beautiful, functional, and artistic wooden items. Sounds simple enough, right? Well, hold your horses! There’s more to this rodeo than meets the eye.
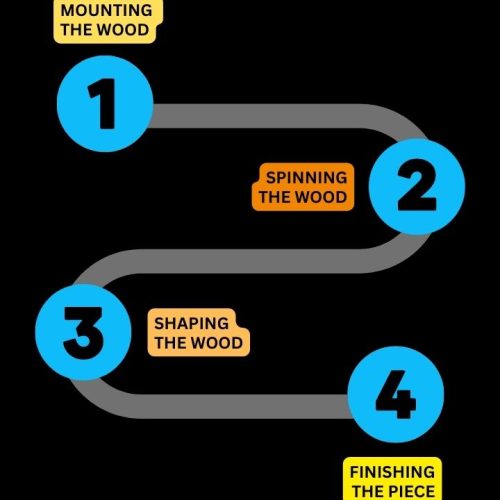
Now here’s the 4-step breakdown on how a wood lathe works:
But before we delve into the step-by-step process of turning a simple block of wood into a work of art, we need to familiarize ourselves with the machine that makes it all possible. I’m sure you’ve all heard the saying, “Know your enemy.” Well, folks, in this case, it’s “Know your friend.”
Navigating the Machine: Key Components of a Wood Lathe
A wood lathe may seem like a mechanical wonderland of spinning parts, but it’s surprisingly straightforward once you break it down. It’s all about the details, my friends, so let’s roll up our sleeves and take a look at what makes a wood lathe tick.
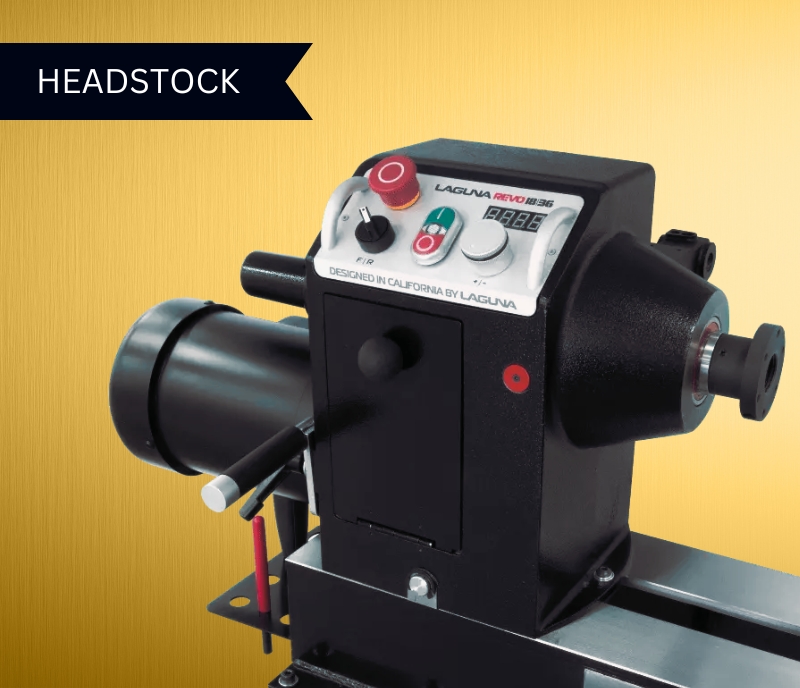
The Headstock: The Heart of the Machine
The headstock is the heart of the lathe, folks. It’s where all the action starts. This isn’t just a piece of metal; it’s the driving force that brings our wood to life.
Now, the headstock is a pretty sturdy hunk of metal, usually bolted onto the left end of the bed. Inside this block, there’s a whole lot of magic happening.
The most important part is the motor. This powerhouse is what sets your workpiece spinning. Motors can range from small, humble 1/2 horsepower models right up to the monstrous 3 horsepower beasts for those big, ambitious projects.
Oh, and before I forget, take a peek inside the headstock, and you’ll see either a belt or a set of gears. These are like the messenger running orders from the king (the motor) to the soldiers (the spindle). The tension in the drive belt can usually be adjusted to change the speed at which the spindle turns.
Belt-driven lathes are quieter and easier to maintain, but gear-driven ones are more durable and can handle heavier work.
One feature I cannot stress enough is the headstock’s speed range. Speed controls allow you to dictate how fast your workpiece spins. Most modern lathes come with variable speed controls, letting you shift gears smoothly from slow speeds for roughing out a piece, to higher speeds for those final delicate touches.
The Tailstock: The Silent Supporter
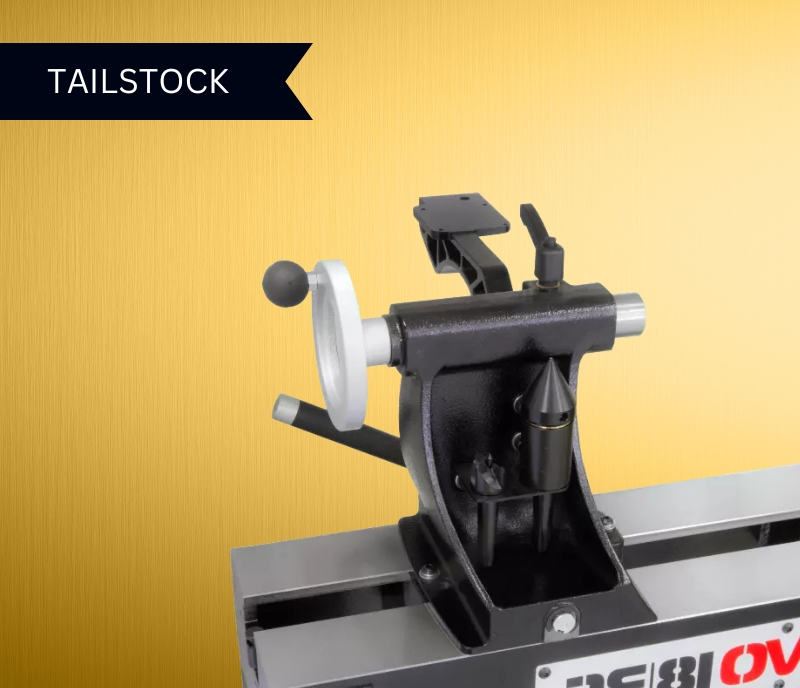
The tailstock may not get the spotlight as much as the headstock, but it’s a superstar in its own right. Sitting on the far end of the lathe bed, opposite the headstock, it’s like the quiet bass player that holds the band together. It might not get the solos, but without it, the rhythm just falls apart.
At its core, the tailstock’s main gig is to provide support. When you’re working with longer pieces of wood, it helps to prevent any wobble or vibration. You see, when the wood is spinning at high speed, any imbalance can turn a smooth dance into a wild jitterbug. That’s when the tailstock steps in.
So how does it work? Well, the tailstock can slide along the length of the bed and lock into position as needed. The main part of the tailstock is the quill, or the tailstock spindle, which can move back and forth within the tailstock.
On the end of the quill, you’ll typically find a live center, a pointed device that fits into a hole on the end of the workpiece to hold it securely.
The brilliance of the tailstock is in its adaptability. Need to drill a hole through the center of your workpiece? The tailstock can hold a drill chuck.
Want to turn a bowl without a faceplate? With a scroll chuck mounted in the tailstock, it’s no problem. You can even remove the tailstock completely when turning, giving you more room to move around.
And when it comes to safety, the tailstock is your best friend. It stops your masterpiece from flying across the room and it isn’t just a turn of phrase. A properly secured tailstock can prevent your workpiece from launching off the lathe. And in the world of woodturning, safety always comes first.
The Spindle: The Dance Floor
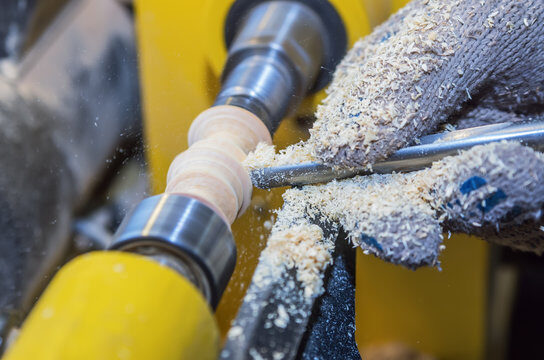
Now, in between the headstock and tailstock, we’ve got the spindle. And it’s more than just a rotating rod, it’s a critical component in the woodturning process, holding your workpiece and dictating what accessories you can use.
The spindle, our dance floor if you recall, is the main axle that extends out from the headstock. It’s responsible for holding and spinning your workpiece. By adjusting the speed of the spindle, you control how fast your wood is spinning, and hence, how quickly your tools can shape it.
The most important thing to remember about the spindle is that it’s threaded. This threading allows you to secure a wide range of accessories like faceplates, chucks, and centers onto your lathe.
You see, the thread count (or TPI, threads per inch) and diameter of your spindle dictate what type of accessories you can use. Typical spindle sizes in the US are 1 inch by 8 TPI or 1-1/4 inch by 8 TPI, but you might run across others.
Friendly Reminder: Make sure any accessory you get matches your spindle’s thread size, or you’ll be trying to fit a square peg in a round hole, metaphorically speaking.
Let’s not forget about the all-important Morse taper. Found inside both ends of the spindle, this cone-shaped cavity lets you mount additional tools like drill chucks or live centers.
The Morse taper sizes typically used in wood lathes are #1 or #2, with #2 being the most common. Like Cinderella’s glass slipper, the right Morse taper has to be a perfect fit. Too loose or too tight, and you’re heading for trouble.
The spindle’s speed, controlled by the motor within the headstock, is another critical factor. It determines how fast your workpiece rotates. With most lathes offering variable speeds, you have the freedom to adapt the rotation speed depending on the size and type of wood you’re working with. Remember, larger pieces need slower speeds, while smaller ones can handle a faster tempo.
The Bed: The Backbone
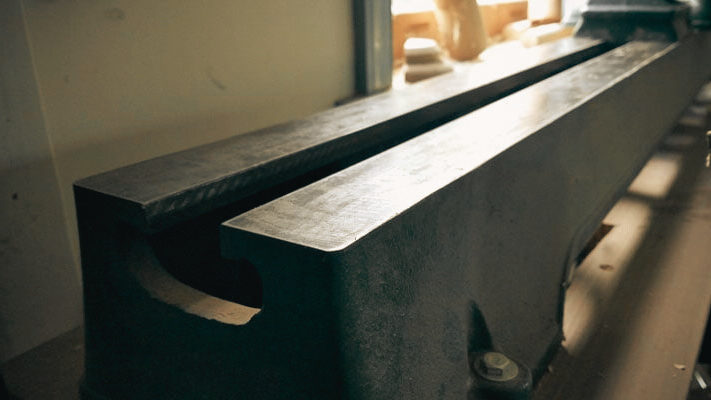
Every machine needs a sturdy framework, and in a lathe, that’s the bed. It’s the long, horizontal beam that stretches the length of the lathe, from the headstock to the tailstock, and serves as the mount for these two vital components.
Typically, the bed is made of cast iron, a material known for its strength and stability. Why cast iron, you ask? Well, when you’re spinning a piece of wood at high speeds, you need something that won’t buckle under pressure, something that won’t vibrate with the force of the spinning wood. Cast iron provides that reliability.
What about size, you ask? The size of the bed will often determine the maximum length of the workpiece you can turn. Beds can range from a little over a foot in some mini lathes, all the way up to several feet in professional-grade machines.
Some lathes even offer bed extensions, for those times when you want to turn something extra long, like a table leg or a canoe paddle.
Now, here’s a term you’re gonna want to remember – swing over bed. The swing is the maximum diameter of workpiece you can turn on your lathe. It’s measured as the distance from the center of the spindle (the heart of the dance floor, remember?) to the bed, then doubled.
If a lathe has a swing over bed of 12 inches, that means you can turn a bowl that is up to 12 inches in diameter.
But Remember: Just because your lathe can swing it, doesn’t mean you should go full tilt from the get-go. Always be aware of your machine’s limits and work within them.
Now, let’s talk design. Most lathe beds are designed with a flat or inverted V-way system. The V-way system allows the headstock, tailstock, and tool rest base to slide along the length of the bed and lock in position as needed.
This design helps accommodate different sizes and lengths of workpieces. It’s like the adjustable seat in your truck, letting you find the perfect position for the task at hand.
The Tool Rest: The Woodworker’s Third Hand
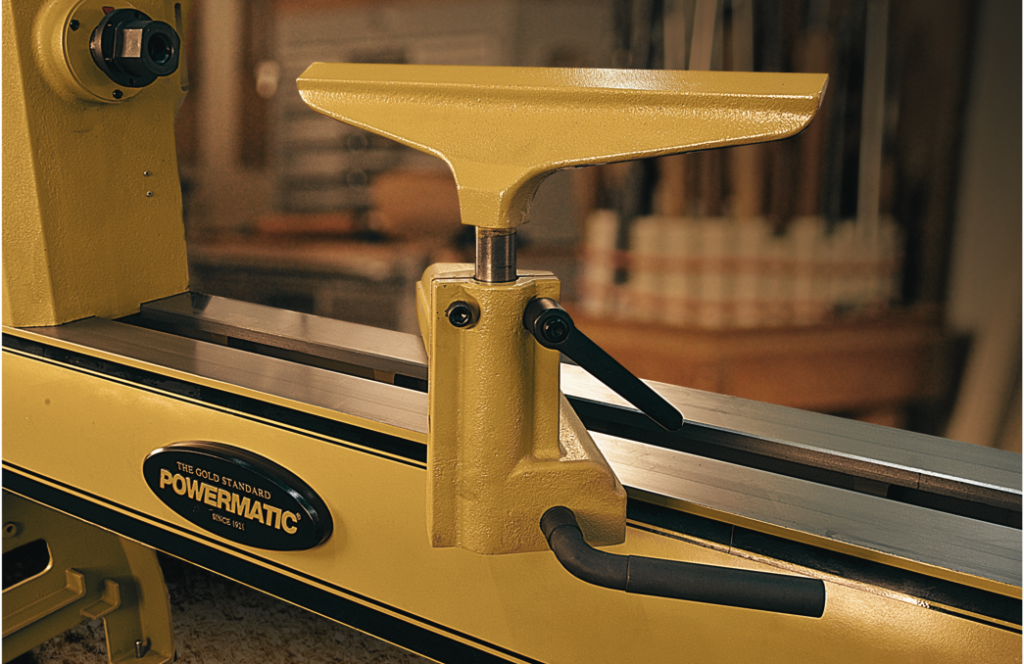
The tool rest is where your tools come to, well, rest. It’s a horizontal bar that sits perpendicular to the workpiece, providing a base for your tools while they’re in use. You place your tools on this so that they’re steady when they touch the spinning wood. This way, you can focus on maneuvering your tool to get the shape you want, rather than worrying about keeping it stable.
The tool rest is mounted onto the lathe bed and can be adjusted vertically and horizontally to accommodate different workpiece sizes and shapes.
The structure of a tool rest typically includes three parts: the post, the arm, and the rest itself. The post is the part that fits into the lathe bed’s banjo, a component that clamps onto the lathe bed and allows for adjustments. The arm extends horizontally from the post and holds the actual tool rest, the part where your tools, well, rest.
What makes the tool rest so important is the support and stability it provides. By allowing your tools to rest on the bar, it helps you control the cutting depth and prevent ‘dig-ins’—a woodturner’s worst nightmare. With the tool’s bevel rubbing against the workpiece and the cutting edge making contact, the tool rest acts as a pivot point, allowing you to control the tool’s movement smoothly and accurately.
Understanding The Mechanics (Or How A Wood Lathe Works)
Now that we’ve introduced our main players, the next step is to understand how they work together. So we’re gonna get back to those 4-steps breakdown I’ve mentioned on the start. Thus, let’s find out how a wood lathe actually works!
Step 1: Mounting the Wood
Mounting the wood on the lathe is where it all starts, folks. This is where we secure the rough block of wood onto the lathe. Think of mounting the wood as setting up a dance floor. It’s all about making sure everything’s secure before the music (or in this case, the lathe) starts.
There are several ways to do this, but the most common methods involve using:
- a faceplate
- a drive center
- a chuck
- The faceplate is a flat metal plate that gets screwed onto the end of the wood. Once it’s attached, you secure the faceplate onto the headstock spindle. This method is ideal for bowl or platter projects where the grain runs perpendicular to the lathe bed.
- The drive center, on the other hand, is used for spindle turning where the grain runs parallel to the bed. The drive center is wedged into the headstock and the wood is forced onto its sharp teeth. The tailstock is then brought up to secure the other end of the wood.
- The chuck is a special clamp that holds the wood. It’s a fantastic tool that allows you to hold a variety of shapes securely. Chucks come in different styles: some are keyed, some are not. The key is a handy little tool that helps you tighten the chuck.
The key here (pun intended) is to ensure the wood is securely mounted and balanced. If it wobbles or feels loose, it’s safer to stop and adjust before you power on the lathe.
Next, position your wood between the centers. Align the centers so your wood is balanced and secure.
Give your wood a manual spin to make sure it clears the tool rest and there are no other obstructions. All set? Great! You’ve mounted your wood!
Step 2: Spinning the Wood
Once the wood is secured, we’re ready for the dance to begin. Turning on the lathe sets the wood in motion, spinning it rapidly along its axis. The speed of the spin is crucial and can greatly impact the outcome of your work.
Lathes come with variable speed controls that allow you to dictate how fast your workpiece spins. If you’re working on a rough piece or a larger diameter workpiece, you’ll want to start with a slower speed to ensure control and safety. As your workpiece becomes more balanced and you’re adding the finishing touches, you can increase the speed for a smoother finish.
Always remember, speed can be a friend or a foe, so respect it. The right speed can make your work easier and safer. So take the time to understand and adjust the speed controls on your lathe and you’ll be golden.
Step 3: Shaping the Wood
This, my friends, is where the magic happens. Shaping the wood is where your creativity comes to play. Whether you’re crafting a delicate spindle or turning a robust bowl, the process remains the same. You’ll press your chosen tool against the spinning wood, removing layers until you’ve achieved your desired shape.
Different tools will give you different cuts and shapes. Gouges, skew chisels, parting tools, scrapers – each has its unique strengths and purpose. It’s all about understanding how each tool interacts with the wood and using them to your advantage.
Keep in mind, folks, always present the tool to the wood at a right angle first, then gradually pivot the tool to start cutting. And remember, patience is your best buddy here. Don’t rush it – let the tool and the lathe do their work.
Step 4: Finishing the Piece
Once you’ve achieved your desired shape, it’s time for the finishing touches. This involves sanding the piece to smooth out any rough spots and then applying a finish to enhance and protect the wood.
Start by sanding your piece with coarse-grit sandpaper, moving up to finer grits for a smooth finish. Always sand with the grain to avoid scratching your beautiful creation. Make sure the lathe is at a low speed during this process!
Next, apply your finish. When it comes to finishes, you’ve got a whole world of options. From oil finishes that bring out the natural beauty of the wood to lacquers that give a hard, glossy finish – the choice is yours.
Remember, finishing isn’t just about looks; it also protects your wood and can make it last longer. Apply the finish evenly, let it dry, and there you have it!
Finally, cut the piece off the lathe, or remove the faceplate or chuck. Admire your work: a beautifully turned piece, ready to show off.
Choosing Your Tools: The Right Crew for the Job
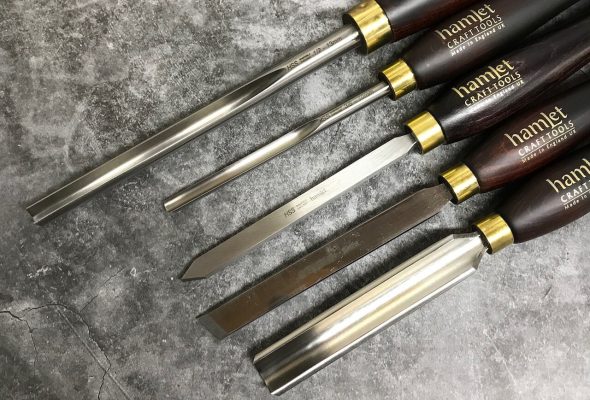
Woodturning isn’t a one-tool show. Far from it. It’s more like a team sport, where every player has a specific role to play. Different jobs call for different tools, and knowing which one to use is half the battle.
Now, you might be thinking, “Chuck, can’t I just grab any tool and get to work?” Well, my friend, that’s like trying to bake a cake with nothing but a spoon. Sure, you could stir the batter, but good luck slicing, whisking, or measuring.
In woodturning, each tool is designed for a unique purpose – some are for shaping, some for detailed work, and others for finishing touches.
What you’re doing and the type of wood you’re working with will heavily influence which tools you reach for. A roughing gouge might be perfect for starting off a spindle project, but it wouldn’t be safe or effective for hollowing out a bowl. That’s where your bowl gouge would come into play. And let’s not forget about your scrapers and chisels – they’re crucial for adding those final details and achieving that smooth finish.
Choosing the right tools isn’t just about the task, though. It’s also about comfort and control. The best tool in your arsenal is the one that feels right in your hands. So experiment, play around with different tools, find what fits for you.
Accessorize to Maximize Your Wood Lathe Work
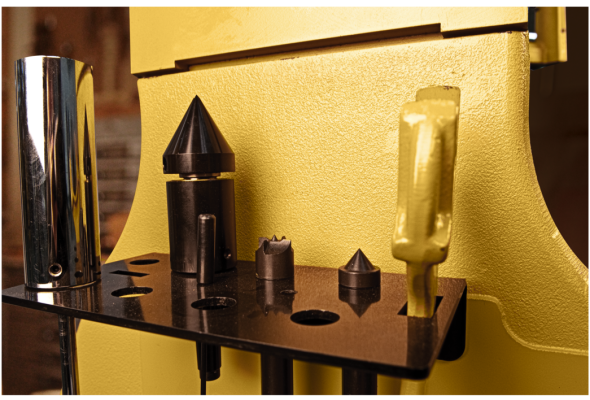
Now, while the lathe is the star of the show, don’t overlook the importance of accessories. They might not be the main event, but they sure can make your woodturning life a whole lot easier and safer.
Things like calipers, faceplates, chucks, and drive centers may not be in the limelight, but they’re essential supporting actors. For example, a good chuck holds your workpiece secure while a set of calipers ensures you’re hitting the precise measurements.
Now, let’s not forget safety accessories. Your trusty face shield and dust mask are going to be your best buddies in the shop. They’ll keep you from eating sawdust for lunch and shield those peepers from any rogue wood chips. Don’t skimp on these – you can’t put a price on safety!
So remember, folks, accessorizing isn’t just for fashionistas. In the world of woodturning, the right accessories can make your job easier, safer, and let your craft truly stand out. Choose your accessories wisely and they’ll elevate your work from ‘alright’ to ‘extraordinary’.
Common Problems and Handy Solutions
PROBLEM | SOLUTION |
1. The wood isn't shaping as smoothly as you’d like. Your tools are tearing your wood instead of cutting it gently. | Keep your tools sharp and in good nick. Dull tools make woodturning more difficult and dangerous. Regular sharpening keeps your tools efficient and helps achieve cleaner cuts. Invest in a good sharpening system and learn how to use it properly. |
2. Your lathe is shaking and making your work harder and affecting the quality of your turning. | Lathes are like cars – they need a little TLC from time to time. For shaking issues, first check if your lathe is on a stable surface and properly bolted down. If that doesn't help, your lathe might be off-balance. Try repositioning your workpiece or adjusting the speed. Still got problems? It might be time for a maintenance check-up. |
3. The wood keeps flying off the lathe. | Your piece might not be secured properly. Make sure it's tightened between the headstock and tailstock. |
4. Your lathe tools keep digging in and causing unsightly gouges in your wood. | Sounds like you might be angling your tools a bit too aggressively. Remember, let your tools kiss the wood gently, not bite into it. |
5. You're seeing ridges or lines in your work that you didn't plan for. | This might be a technique issue. Make sure you're presenting your tool to the wood at the right angle, and that you're making smooth, fluid motions. If it persists, check your lathe for any vibrations or alignment issues. |
6. The lathe is leaving marks or burns on your wood. | This usually happens when you're spinning your wood too fast or when your tool stays in one spot for too long. Try reducing your lathe speed or moving your tool more consistently across the workpiece. |
7. You're getting a lot of wood chips and dust in your workshop. | Set up a dust collection system to catch the bulk of the debris. A good air filtration system will also help with the finer dust particles. |
8. You're struggling to turn larger workpieces. | Turning larger pieces can be a challenge, but it's all about stability. Ensure your workpiece is properly balanced and secure on the lathe before you start. You might also need to adjust the speed of your lathe - slower speeds are safer and more manageable for larger pieces. |
9. Your arms and shoulders are feeling the burn after a woodturning session. | Adjusting the height of your lathe to a comfortable level can help reduce strain. Remember also to take breaks and stretch. |
10. You're having trouble hollowing out your vessels. | Hollowing can be tricky, but specialized hollowing tools can make the job easier. Also, consider using a light source to shine through thin-walled vessels - this can help you see the wall thickness and hollow out your piece more evenly. |
Final Reflections: The ABC’s of How a Wood Lathe Works
Well, my friends, we’ve traveled quite a distance together in this deep dive into the world of wood lathes. We started off by unraveling the mystery of what a wood lathe is and how it works. From the essential parts like the headstock, tailstock, and tool rest to the action of the spinning wood, we went through it all.
We explored the nitty-gritty of the woodturning process, step by step, starting from mounting the wood and spinning it, moving on to shaping it, and finally, adding the finishing touches to our masterpiece.
Then, we chatted about our companions in this craft, our tools and accessories. We learned choosing the right one for the job can make all the difference. And we also didn’t shy away from problems and potential pitfalls, did we?
So there you have it, a comprehensive answer to the question “How does a wood lathe work?” Remember, though, woodturning isn’t just about understanding how your tools and lathes work; it’s about the rhythm, the feel of the wood, and the thrill of creating something with your own two hands.
The beauty of woodturning is that no two pieces are the same, and no two turners are the same. You’ll develop your own style, your own quirks, and your own way of dancing with the wood.
And if you want to dive deeper into the woodturning world you can check out my top 5 wood lathes recommendations.
But until next time, keep that wood spinning, keep learning, and most importantly, keep having fun. After all, isn’t that why we’re all here? Happy turning, my friends!


